Saturday, February 12, 2011

Church bag!

So last week I got tired of my current church bag. I am in Young Women's so generally I carry my lesson book, handouts, my binder, scriptures, and my sunday school book. My current bag was always stuffed to its fullest capacity and it would fall over when ever I set it down. So it was time for a new bag. One that would stand by itself and was super cute of coarse. I got the idea from a notebook I had bought at swissdays.


(if you like this notebook.... go to www.vinyliciousdesigns.com and check out all the cool things this lady makes, amazing and totally unique)
I absolutely love the style of this notebook and when I absolutely love something it normally inspires me. So i scavenged all my vinyl that I owned and made this


I hand embroidered all the edges and the skull. It was really fun to make. It has a square bottom so it wont fall over and is plenty big to even carry my scripture case inside. I am really happy with it. I think I might add a pocket inside for all my pens and pencils, lip stuff, and my mini lotion bottle (thanks Kathy Hines).

Thursday, February 10, 2011

Another Skirt!!!

So three weeks ago I was feeling creative and in the sewing mood. I thought about making myself a swimming suit but could not find any material that I liked enough. I was wondering through the material store and found the cutest fabric. The question..... What to make? I found some matchy colors and decided I would make another skirt. I did not want it to look like my other skirts though because I already had two of them and it was time for a harder project. This is the vision I had in my head:


(finished project)

INSTRUCTIONS ON HOW TO MAKE...

I just had to figure out how to make it. I started by cutting out panels that were 7 inches wide by 14 inches long. I sewed them all together alternating floral, brown, floral, green, floral brown, floral, green (sewing down the lengths. Then I did a really long stitch all the way across the top so I could gather the top. After I gathered the top I sewed the pink panel along the top, brown panel along the bottom, and brown panel on top of the pink. These panels are made by taking a length of fabric and folding them in half (hot dog style) with the good side of the fabric out (not in) then sew the unfinished length to the back of the skirt, this way you do not see the seems and you do not have to hem anything. You will not see any stitching when the skirt is done. It is all inside. Now I just needed a way to keep the skirt up. If you have read any of my previous posts you will know that I hate wearing skirts that give my lines around my stomach..... unfortunately I am not a size 6. So, I like to put Jersey knit on the top of my skirts that go to my natural waist (just like the Down East skirts). Also I can still wear them once I get pregnant. They are kinda like maternity pants but cute and not tacky. The white part is not seen when I wear them. It just holds the skirt up without giving my ugly lines. This part is done by measuring my natural waist. The rest of the skirt is bigger and wide enough for my widest parts (the line around butt). You then just take the jersey knit and lay it above of the rest of the skirt , mind you, the skirt is not sewn up the side yet so it is just a big rectangle. I am going to start using pictures with this cause this is the hard part. This is not the real skirt (just a miniature version so you get the concept) This is the same way I make my other skirts. The brown section I simply pleat first (with pins) on my other ones. On this one this is the upper bown panel that I am pinning it to.


with the jersey knit on top you line it up in the middle of the skirt. it should be several inches shorter then the rest of the skirt.
put a pin through the jersey knit and skirt right in the middle of both.


Then take the left end of the jersey knit and the left end of the skirt and pin them together.


Do the same on the right side.
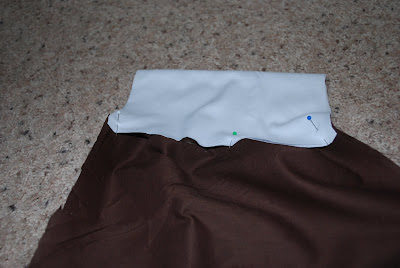


Now comes the tricky part to try and explain.... take the left end and middle (where you put the first pin) and pull them so the jersey stretches and you can put a pin in the middle of the other two pins. Once you let go you will see it bunch back together. Do it on the right side as well and then it will look like this:
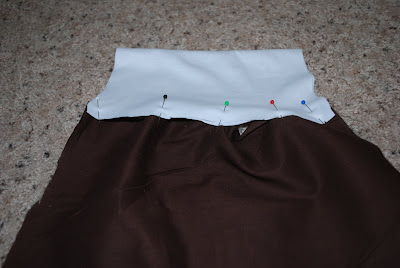


after this just fold the bottom part of the skit under the jersey and you are going to sew through the pins. as you sew though, you need to tug the knit so it is the same width as the bottom of the skirt (basically you tug it taught with skirt as you sew in-between the pins), you don't want to leave it gathered in-between or the brown will not fit you. It will be way to small. After this you fold the whole skirt in half and sew up the side (make sure it inside out so the seem ends up on the inside. Then you just trim all the seems (I use pinking shears so it does not fray). Then sew the buttons on the outside front, these are just for decoration.

If you really want to make this skirt just call me and I can better explain how to make it. I am the kind of person where this is all just in my head and really hard for me to explain how to do it without showing you. Most likely that is because I can't read instructions to figure things out. I have to just be shown if I can't figure it out. So it is hard for me to write instructions.

It was really fun to make and only took about 2 or so hours to make but my other skirts only take about 30 minutes. So it felt like a long time. There is just a lot more cutting, measuring and sewing. I love the finished project though. So cute....
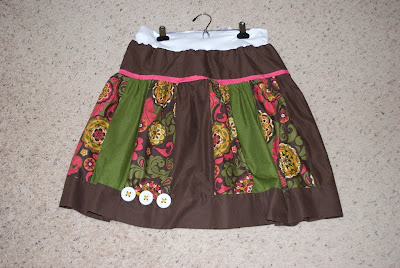


The top (jersey knit) is scrunched down, it is actually about 5 or 6 inches tall


Thursday, January 6, 2011

Sorry this took so long!

Hey Bloggers, Sorry it has taken so long to post. I had a super busy christmas. On thanksgiving my Mom and Dad gave a challenge. Underneath our Thanksgiving plate was a crisp 100 dollar bill with a charge to take the hundred dollars and do something to increase the money. Then use the money to donate to a christmas charity. I was so excited.... I could barely sleep that night, even with the help of the turkey. What would Tim and I do to make this $100.00 and turn it into something more. Lets go back a few steps..... every year, instead of getting my parents a Christmas present we take the money that we would have spent on a Christmas present and spend it on a charity. Then on Christmas morning we write down what we did and put it in an envelope and stick it in the tree. They are the last things opened Christmas morning and it is everybody's favorite part of Christmas. All my siblings get in on it and we all do something different but meaningful. That is why this project was going to be so fun. Normally Tim and I only have $100.00 to give but this year we had an awesome opportunity to give more.

As you might remember from previous posts, I had started making these:


So this is what Tim and I decided to do with our $100.00. We got to work right away making a website where people could buy them. We decided to just do christmas ones. We wanted to do 40 boards.... sold at $20.00 a piece. We ended up selling 25 for $20.00 a piece. Exactly $500.00. This was by far one of the best christmas's I have ever had because of the help we were able to give. I would love to tell all of you what we did with the money but the people that we gave to might just be reading this post. I can tell you this much. We were able to help three awesome families. One of the families we went in with my little brother Wesley and my little sister Paula. They were able to come up with $400.00 on there own and we gave $100.00 to donate to a family in my parents ward. All together my siblings and I were able to raise over $1600.00 to benefit families from West Jordan to Salt Lake, to Logan. It was so fun! Here are some pictures from the process.....


Yes.... they were all over my house. This was all but a handful of them.

Wednesday, November 24, 2010

ITS DONE!

So I finished the table.

I am actually pretty happy with it. I spent from about 2:00 yesterday to about 6:00 today working on the darn thing but I am happy. I did a gray table with black stain. I started by priming it with KILZ primer. I did two coats of that, then I primed all the chairs. I painted one coat on the table of the gray before going to bed last night. I did not like the color when I woke up so I added a little white and a little gray from my little stash of acrylic paint. Then I went to work! I did another coat on the table, then painted all the chairs twice. This took really long. I think if I had to do it again I would have used spray paint. Unfortunately, I could not spray paint yesterday because Utah decided to have a blizzard and it was probably 15 degrees in my garage. So, I hand painted the whole thing. After I was done I took a black stain and rubbed it in, then I used a damp cloth to wipe most of it off and just leave it in the crevices, corners, and cracks. Once I got this technique down it was pretty fast moving. Then I took a polyacrylic finish and painted everything with that. This just gives it a finish to protect it. It dried really quickly and hardly had any fumes. I started next on recovering the chairs. I picked the material because it had red and black (most of the colors in my living room), gray (the color I wanted to do my table in), and yellow (my most recent fav color). It tied everything and I love it. In case you are super attentive, it is the same material used in my skirt from a couple of posts ago. I just really like it!

First people to see and use them you ask......... Tim's YM came over to play video games. None of them really appreciated it! haha

sorry for all the pictures.... I loaded all the ones I took while working on it.


Here is the before picture in case you did not see my last post


after the second coat of primer


hehe, this is the blizzard that hit when I was trying to finish priming the chairs. I could not keep the windows and doors open for ventilation because the snow was blowing inside!


This is when I was trying to get the glaze/stain to work


Tuesday, November 23, 2010

I am doing it!

Yay, so tim let me go and buy the paint this morning to redo my kitchen table and chairs. I am so excited to get started. Here are a few before pictures. I absolutely hate the material on my chairs so those will be recovered. I love the tile on the table and think it is unique so I did not just want to buy a whole new table. I hate the different colored wood from the chairs to the table so that will be fun to get rid of. I will update you when I am finished with it. Wish me luck


See how the wood on the chairs and the table are different colors.


Wednesday, November 10, 2010

Quick update on yesterday's crafting!

I decided to update you on my crafting from yesterday. After finishing all the laundry and cleaning (4:30) I made a trip to IKEA for some new shelfs to paint. I did not have a thanksgiving one yet. I figured while I was making my thanksgiving one, I may as well make a christmas one too. If anyone wants one they are $22.00. That covers the cost of paint, stain, vinyl, hardware to hang from, and ribbon if hanging from the top. If you want a custom one they are $25.00.


If you want to see some other projects done with yellow check out this awesome site allthingsthrifty.com . She has some really cute yellow furniture that she is done. normally she uses a black glaze. I thought about doing this one with a black glaze but I wanted it to be thanksgivingy and my vinyl was brown, so I did a brown stain instead. Jump over to her site and give her some love!

This one, I wanted a reminder to say my prayers at night so this has glow in the dark paint behind the word pray! It looks awesome in the dark, and I think it will be an excellent reminder. Also sometimes I wake up scared at night and it will also serve as a reminder that he is always there and all I have to do is pray...


Tuesday, November 9, 2010

Skirts!

So a couple of months ago I decided a really really wanted a sewing machine. I did not know why I wanted it. I just wanted it. Did i know what I was going to make with it once I got it..... nope! So Tim thought this would be a good oportunity to bribe me. He said "if you go wait in the student aid line (for school), then you can get your sewing machine". The reason he said this.... because that is the worst line in the history of lines and he knew I would stop putting it off and go if he just bribed me. Sad... but sometimes that is the best way to motivate me. Today he bribed me that if I did all the laundry while he was gone and cleaned the kitchen that I could "craft" or at least that is what he calls it

craft VERB(in my case) /kraft/:
To spend lots of money buying things to make at home. Normally takes time away from cleaning and laundry. However, is lots more fun than cleaning and laundry, and can range from knitting christmas stocking, to YW handouts, to painting, and sewing. (this list is not inclusive).

anyways, eventually I got my sewing machine. I had been stewing what to make for a couple days leading up to the purchase. Sometimes when I am falling asleep or waking up I get ideas on things that I can make. This used to actually happen to Einstein too. Now, I am not saying I am Einstein by any means... but it is a proven fact that is when the idea part of our brains is most active. In fact, Einstein used to lay on a cot in his lab and hold a rock in his hand. He then would start thinking about things so he could get ideas. If he fell asleep the rock would drop and wake him up. He claims that this is where he go the idea for electricity. cool huh... Ok sorry for the history lesson but I think that he is brilliant. I try to stay awake a little longer and I never get out of bed immediately after waking up either. This is my thinking time. I don't normally think of projects but sometimes they come and that is where I get some of my best ideas. Weird ... I hope I did not lose all my readers right there (if I do in fact have readers)!

Well, I got an idea for a skirt. My most favorite skirts are the ones with the jersey knit on the top instead of an elastic or a zipper. They don't give any lines, and are just as cute as a zipper or elastic waisted skirt. I had seem some really cute chunky floral fabric and I wanted to make a skirt from it, then put a hem with the main color from the fabric. These are what I made... the night I got my sewing machine. I was just a little excited....


If you want the directions for these just leave a comment or facebook me. They are not hard, really! A great first or second project for beginners. Also, there is some really cute fabric out there. That is almost the best part of making them is getting to go pick out fabric. They are super easy and thrifty though... so easy we taught all the YW in my ward to make them for one of their Person Progress projects. My whole ward now has them, needless to say. Don't get me wrong though.. I am not mad that we all have them. I love that we are making the world a little cuter, one woman at time.

EASY PROJECT OF THE DAY


A cheap way to decorate for fall (they are just paper). I used my cricut to cut these but you could also just trace them and cut them out, or have you kids help you cut them too. Just make sure you use lots of different colors. You really could do this for any holiday or season. You could do christmas trees, bunnies, hearts, stars, and so on. You could also buy the fake leaves from michaels or roberts as well.